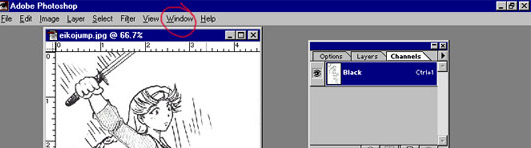
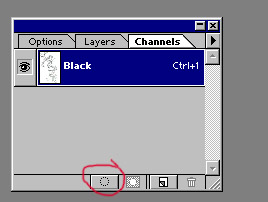
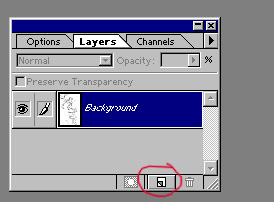
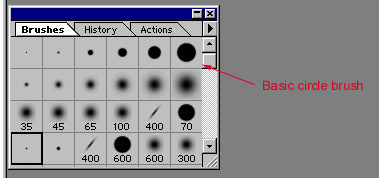
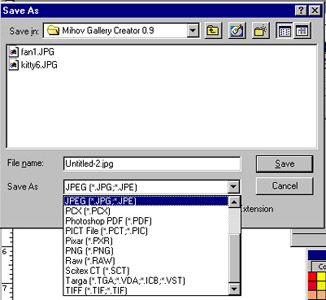
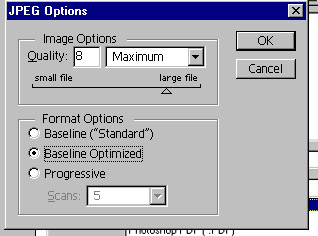
| Introduction to Layers and making clean outlines By SW edited by - DVcomp Compare and contrast - WHY YOU SHOULD USE LAYERS pic done without layers pic done with layers ---Making a outline that will remain clean while you color--- Now, what you are going do is kinda like making a copy of the lines that you will color under, kinda like the way you would color in an animation cell. Before you start, you might want to clean up your image a little. For example, you could erase extra lines or smudges. Or, you can shrink your image to a smaller size. {To change your picture size, go to "image" on the top menu bar, and click "image size", which is located on the drop down menu. (hint- I find that measuring in pixels is easier then inches at times) } 1) Go to the menubar option "windows". -click "show channels". -After that, click "show layers". 2) Now, on channels, click the little box with the circle called "load channel as selection". Clicking on it should select all the white on the picture. It works kinda like the "magic wand". However, it does all the selecting for you. 3) Afterwards, go up to "select" and click "inverse". It will border off all of the lines, like a cookie cutter. 4) Now go to "layers" and click on "new layer" (small box like shape). This will create a blank surface for you to work on. Any work done on a layer can be erased without ruining the original pic. This process could be equated to covering your picture with a piece of tracing paper. {Note-if you don't have brushes open already, go to "windows" again and click "show brushes"} 5) Now select "paint brush", and pick a large brush size. (Note- I use a size 500 basic circle brush. It's not in the presets, so you'll have to make your own. ^_^; ) 6) Pick a color that you want the outline to be. 7) Make sure that you're working on "Layer one". I can't stress this enough; If you do not work on the first layer, you are going to be working on the original pic. 8) Color over all of the lines, make sure you don't miss a spot, or the outline will be incomplete (This is why I suggest a LARGE brush size). Try to color it evenly. If you don't color it evenly, then the outline is going to look darker in some places and lighter in others. ~~~ Line weights ~~~ -Going over the image twice seems to work best for a nice, solid line. -For a very light line, only go over it once. -If you cover it more then 3 times, your lines are going to become very thick and rough-looking. 9) Deselect the outline-one way of deselecting is to go into "select" again. Doing so will get rid of the line selection, allowing you to work on the rest of the picture. 10) When you finish, create a "new layer" under "layer one". Make this layer white by filling it in with white using the Paint Bucket tool. Doing this will cover up the original pic, giving the outline a blank background. How it should kinda look 11)Now it's time for the other half of CGing-coloring the image in. For the actual coloring, you can work as you like. However, just make sure that you work beneath your outline, or you shall be defeating the purpose of the whole process. ^_^ I suggest making a new layer for each color. -You can either "magic wand" the section you wish to color, or just color it in by hand-Just remember to clean up the edges later. ^_^ When you use "magic wand", it makes it hard to use the "smudge tool" later on. Smudging allows you to smear and blend the colors- almost like you would with fingerpainting! However, the magic wand will leave a white line, like with clothing folds. The great thing about layers is that it always allows you to protect your other colors and lines. You can move layer positions and also trash them or make them clear. It's great for effects and such. ~~~~REMEMBER TO ALWAYS SAVE WHILE YOU WORK~~~~ ~~~~ Also remember to check what folder you are saving to, makes opening it later easy~~~~ 12) MAKING YOUR PIC INTO WEB VIEWABLE -You must save it as a .JPG or .GIF. Remember- The GIF format's small size is the result of the fact that it only supports 256 colors, while the larger JPEG format supports millions. So, if you have a picture with a limited palette of colors, save it to GIF format- It'll be much more efficient and it'll help you conserve disk space. If you have an image of more than 256 colors, save it as a JPEG. Any layered pic can only be saved as a ADOBE document. It should show up as .psd. This means that it can only be opened in an Adobe program, or a program that can open adobe files. This is not acceptable for posting online or sending via E-mail. To be able to make your finished image ok for JPEG or GIF format, you have to flatten your image. Going into "Layer" at the top of the screen, click on "Flatten image" at the bottom of the list. This will compress all of your layers into one background layer. This is also a good time to shrink your pic, if it's too large. -Then, go to "SAVE AS" and change the pic settings to JPG or JPEG or BMP(bmp, a.k.a. bitmap, is usually a very low-quality file. ) -A save quality setting will pop up, 8 is a good level, if you want a slightly smaller file. This file quality allows for a faster upload to a server while maintaining a fairly good image quality. |
 |
 |
 |
 |
 |
 |
| We hope this helps you! We would love to hear from all of you who found it helpful, and if it didn't let us know anyway so we can improve upon it. This was all carefully written and screen snapped, please do not use with out asking first. ~SW Go Back This has been a Genki Inc. Productions 2002 |